a webcam's gaze: thoughts going out
The Webcam’s Gaze: Final Report
Charles Yan Miller
CART 457-AA: Independent Study
supervised by Pippin Barr
December 10, 2020
Purpose
The purpose of the independent study was, as stated in the first line of my proposal, fundamentally technical. No matter the final project, I wanted to implement some of the staple features of real-time 3D graphics in games. By my estimation, that was: perspective projection, texturing, lighting, shadows and reflections.
Overview and Philosophy
For the first weeks of the semester, I got familiar with the general API design of OpenGL — that it is a state-machine, and that calls are therefore context based, dependent on the previously set state of the system. In Open GL land, what is expensive, from a performance perspective, are state changes, and therefore the fundamental ethos of optimization is caching and batching. Caching meaning doing as much up-front work as possible, and thereafter only sending data that’s changed. This implies the need of systems to track and record changes on the CPU side so they can be efficiently uploaded to GPU as needed. Batching meaning bundling up of data changes together so they can be sent in a single call, say at the start of every frame. These performance considerations determined the underlying architecture of my framework. In turn, this shaped the design of the artistic project being developed within the codebase. In practice, considering the beefiness of my personal computer relative to the small scope of my project, much of this performance conscious engineering was not necessary to have a real time final project. Nevertheless, from a pedagogic perspective, this concern was vital to the success of the independent study. Understanding performance costs and solutions equates to having a deep understanding of the underlying mechanisms of whatever you’re interfacing with. Throughout this report I’ll try to go into appropriate depth of my technical journey, but also how the evolution of my codebase affected, and was affected by, my artistic agendas.
Sending data to the Graphics Card
Throughout my first weeks of my study, I came to understand that there three fundamental ways that a CPU can data to Shaders with unique characteristics which must either inform your artistic design or be coded around.
Uniforms
There are uniforms, which are small bits of data, a vector or matrix, which can be changed at a low cost and accessed arbitrarily shaders side. Uniforms therefore don’t have a huge influence on the underlying architecture of rendering systems, but consequently, are limited in their inability to scale.
Vertex Attributes
There are Vertex Attributes, which are huge buffers of data which you partition into uniformly sized vertices and then further separate into various attributes — being the actual variables accessible by a shader program. A shader program is then run once for every vertex in the Vertex Buffers. The data inside a vertex could be anything, but in a RT3D context usually contains a position, normal, UV coordinate and indices.
There’s a significant amount of complexity and error checking that is performed to set up these buffers, so early on I decided to only allow a single buffer per material, and to not allow for the manipulation of the data after initialization. This represented this first reduction of the possibility space for the final project, no longer could persistent changes be made to the mesh as changes to vertex-based data could not take place after the initialization of the project. I would no longer, for instance, be able to have the player permanently warp a surface when walking near it. I also (in retrospect naively) tied the creation of a material with its vertex buffers. In practice, this means that a material and its mesh are, in my framework, inextricably linked. The creation of a material involves the uploading of a mesh to a graphics card. This means that in order to have, for instance, a green rubber sphere and green rubber cube, you still must create two separate materials, because even though the shaders and uniforms might be the same, the meshes are different. This had huge design implications, it slowed the iteration process, and discouraged the reuse of shaders with multiple meshes.
Lastly, I had some trouble getting indices working in the framework. Indices based rendering allows the user to reuse vertices multiple times, say if a vertex was part of multiple triangles. This is a memory saving optimization which I never successfully implemented.
Textures
Textures are potentially huge one, to three dimensional blocks of up four dimensional vectors which can be accessed arbitrarily on the shader side. They take a long time to upload, and once in VRAM, only a limited amount of bounded textures can be sampled at any given time. I was really surprised at just how manual texture memory management was — how much work would have to be put in to allow for realtime large, high resolution scenes.
In OpenGL you can upload a texture to one of a limited number of Texture Units, each unit can be associated with multiple textures. When writing or reading, however, only a single texture from a given texture unit can be used. This means a system or author needs to know what textures will be needed in any given shader and will know to bind the textures to different Texture Units so they may be accessed simultaneously by a single program.
There’s also a question of batching. In large scenes with lots of small objects, its performant to combine textures together into a single atlas so textures mustn’t be continually rebound. You can then render everything in as few draw calls as possible. Generally, this is achieved by creating some virtual texturing system which allows you to ignore the fact that now you’re now sampling from a huge atlas, so you can use the same UVs shader-side. I wanted to avoid the unknown (but likely high) added complexity that any such system would add to C# (and to a lesser extend GLSL) code. I didn’t introduce any texture batching systems because of this. Instead I manually batched textures and meshes together into single models in Blender before exporting them to my framework. This allowed me to focus my resources elsewhere, but it also meant the most of my geometry would be permanently stuck together in game.
You can also use textures as render targets to draw to them dynamically in a Shader. This ability is essential to a lot of the effects I was interested in at the outset of the independent study. I’ll go more in depth to the design and code decisions involved in render textures later in the report.
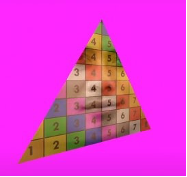
Weeks one-three: textured triangles in space
I first got to work on displaying a triangle to the screen. This involved initializing an Open TK context, writing and compiling a shader program, uploading vertex data. I used an image loading library to deserialize JPGs from disc to upload, then sample them shader side to get a textured triangle. I added a third dimension and began sending transform matrices to the shaders every frame based off the camera’s rotation and position to project a textured triangle in 3D space onto the screen. It was at this early stage, before I really understood the implications of what I was doing, that I tied the concepts of mesh data and a shader program and their uniforms together. I used a .OBJ loading library to dynamically load models from disc. I set in place a draw loop which hierarchically organized like materials together so the fewest state changes were required during drawing. I also created a basic Unity-like gameobject system where GameObjects , in my case called Entity’s, are bunch of function pointers and data that have overridable functions which are called at specific moments of the game, like at the start of the frame, or right before a render. This OOP approach to an entity system isn’t in any way data or performance oriented, but the focus of the study wasn’t on making a game engine, so I just did the easiest most comfortable thing.
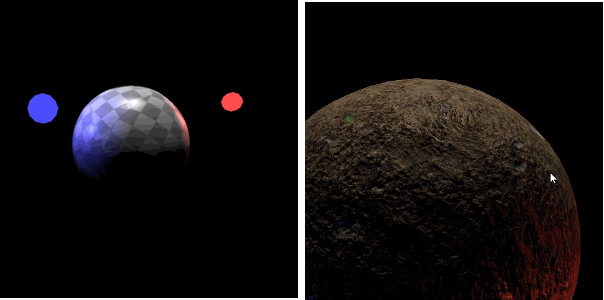
Weeks three-six: lighting and shadows
I added direction and point lights, using them to add Phong lighting (diffuse, specular and ambient shading). I added normal mapping, using some non-trivial linear algebra to transform a normal texture from tangent to world space to use in my Phong lighting. My shader code was becoming unwieldy, so I began refactoring my shader system to support multiple files and helper functions.
I then set out to create cast shadows, which I decided to achieve with shadow mapping. With this technique, you render the scene from the lights’ perspectives, recording the distance to each fragment in a texture. Then when you render the scene from the camera’s perspective, you use the previously generated depth texture (from the light’s POV) to determine if the current fragment is obstructed from the light source. This technique requires the ability to render, and then read from a texture shader side. I worked on rearchitecting my draw loop and extending my texture class to support multiple Render Textures encompassed by a Framebuffer to support shadow mapping. Crucially, I designed this system to allow for the arbitrary reordering, adding and subtracting of these
Framebuffers, so the system could adapt to the needs of any shader, as the artistic needs of the project evolved. I also extended my entity class to support multiple materials, which was required for shadow map effect which might have to render a single mesh twice over the course of a frame.
Refocusing attention
Now I had a technical base: a material system, some fundamental real-time shader capabilities (Phong lighting, normal and shadow mapping), an entity framework and a corresponding draw loop. I felt comfortable to begin giving more attention to the artistic side of the study.
Warping
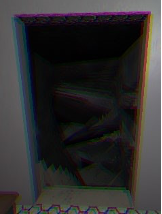
When you build a digital thing from the ground up, at a low level, the last thing you see are the visual, auditory or haptic layers of representation. For the vast majority of the work, it’s the underlying data transformations that are mused, contended with, and manipulated. This can encourage the repurposing of techniques in aesthetically unexpected ways. Shadow mapping is ultimately an exercise of determining when a particular point on the screen (fragment) is obfuscated from another camera’s point of view. The final shadow effect is achieved by simply using the information to darken those obfuscated areas, but you could use that same data to drive any sort of graphical effect. I still didn’t have a clear vision for what the final project would be. I did know, however, that I wanted to find visual metaphors of mental unrest and decay, particularly those relating to the domestic bedroom and quarantine. Warpings and distortions are obvious visual corollaries for mental distress, and the distortion of reality and time that a drastic change in lifestyle might provoke. Often darkness is associated with sleep, a point in a day when an unwell mind has the most space to wander, in these times, often in anxiety. It seemed fitting that areas in shadow would therefore be inclined to warpings. I copy-pasted a noise library from the internet, using it to shift the UV coordinates of the parts of the fragments within shadow overtime. The effect was that areas in shadow were transformed from static dead, to organic living things. Much like how spirals of unhealthy thoughts can feel alive — a thing of there own, outside of their person’s control.

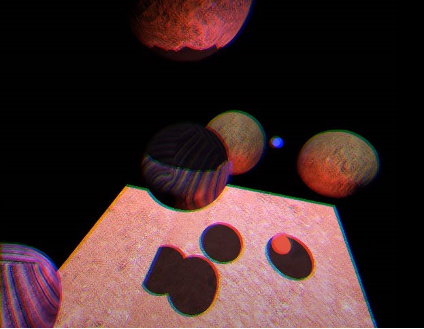
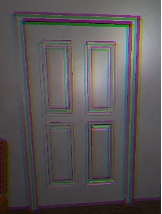
Chromatic Aberration
Shortly after I finished shadow mapping, NSight, a frame debugger I was using, stopped working. I knew I would have to create my own way of viewing offscreen (Frame)buffers so I could realistically debug my application going forward. This meant making it possible to easily manipulate and swap out the final displayed textured. In practice, this is pretty close to post processing system, so that’s what I created. After I got the debugging features working, I created a simple post processing effect to test out my system: chromatic aberration. Originally meant as a little test, I ended up really enjoying the effect. I liked the way it seemed to both obfuscate and embrace the lo-fi, PS2 era aesthetic of the project. I then drove the effect with depth, so that further objects were affected more dramatically. It resulted in effectively a blurring everything in the distance, as if you were in a room reading or staring at a screen too long and your eyes weren’t used to having to focus on far away things. It made the world more claustrophobic, forcing you travel through space and shove things in your field of view to get a better proper look.
Traveling between Bedrooms
My primary artistic interests at the onset of the project were in the effects of the webcam, activated through the rise of video calls, on domestic spaces. More broadly I was interested in (student) life during quarantine. The initial loose idea was to have a series of vignettes, persons’ bedrooms, scanned using photogrammetry, which would be somehow interconnected through video calls. Where webcams could see, the bedrooms would be public facing: deliberately arranged, clean and proper, perhaps with some choice posters, artworks or greenery. Where the cameras couldn’t see however, scatterings and layering of domestic detritus would dominate the rooms surfaces: unfolded clothes, dirty dishes, homework etc. I wanted to explore, and admittedly make a statement, about how the webcam was inserting public space into our most domestic and private spaces.
Unfortunately, I was forced to drop the use of photogrammetry because I no longer had access necessary devices that I had at the onset of the study. I thought it would be a visually pleasing (/cool) effect to interpolate into rooms through monitors. I already had systems which allowed for Framebuffers and thought I could use them to achieve this effect. I added a camera interpolation system, support for multiple rooms and cameras which could selectively render certain objects… I began to realize as I worked, however, that Framebuffers weren’t the right construct for the problem and would likely result in some discontinuities when transitioning between rooms, or at least would leave behind nightmare of logic and edge cases “gotchas”. In retrospect, after listening to a stream by the developers of Manifold Garden (2020), I realized that Stencil Buffers lent themselves much more easily to this effect. More importantly, though, I was realizing that I wanted the vibe that my project gave off to be morbid and lonely. Jumping through rooms and thus teleporting through space like some cyberpunk AI was a power fantasy. Being able to experience so many rooms in such a short time was a fundamentally social, interconnected activity. This was not exactly the somber quarantine vibe that I was realizing I was going for, and I decided to drop the feature for both technical and artistic reasons.
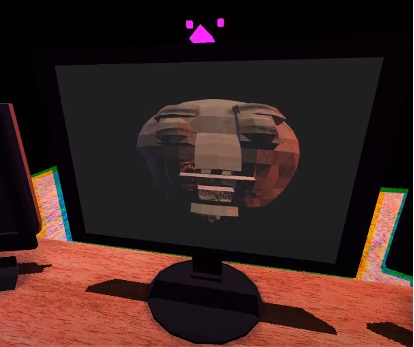
Frustrum
I was still really interested in the effects of the webcam on the bedroom. Why not have the webcam literally insert a difference, public facing room into the space wherever it could see. I created a pointfrustrum algorithm CPU side so I could debug, then translated it to GLSL code. I then could switch between showing two models, one, if it was inside the cameras frustum, the other, if it was outside. In order to really appreciate or even understand the effect, you had to be able to move the frustrum around. The webcam I modelled would clip through the monitor as I rotated it as it wasn’t circular, so I tried replacing it with an eyeball — a much more explicit gaze. This was one of my first small experiments to what would result in the campier horror aesthetic of the final project.
Raycasting
At this point I was rotating the camera with my keyboard. Obviously, this was not an intuitive control scheme, I wanted to be able to simply click the webcam (/eyeball) and then drag to rotate. This entailed a raycasting system, which seemed a large undertaking, but would no doubt be hugely useful if I wanted to develop any other gameplay features (also it would be an excuse to practice some linear algebra!). I knew that if I began using meshes to generate colliders that it would mean casting against tens of thousands of triangle colliders and the game would grind to a halt with a brute force or niave approach. But I also didn’t want to have to manage the (unknown) complexity of employing a spatial partitioning system which would divide colliders into discrete areas in space so that raycasting algorithms could be less than O(n). Instead, I made a compromise, in my system, you would be able to selectively cast against a single collider, an entity’s collider, or the entire world’s colliders. Then I could avoid dynamic spatial partitioning, while not taking the huge performance hit of casting against the entire world every frame.
Walking System
At this point it was clear that I wasn’t going to create or integrate a physics engine into my framework. This meant I would have to create my own walking system. Using the raycasting system, I used colliders to determine walkable space. After modelling a space, my basic workflow became: go back in and model the walkable space (usually just the floor), export that to a .OBJ file, then convert that to an array of triangle colliders on startup and feed them to the character controller to use. The ability to model the walkable space was crucial to having a reasonable workflow for reasons I’ll get into in the next section.
The Consequences of a UI-less, serialization-less framework
Game engines have user interfaces to manipulate objects geometrically. They have serialization systems so data like entity positions aren’t hardcoded, and therefore don’t have to be recompiled whenever changes are made. My framework has neither of these things, what does editing a scene look like in my framework? I manually change position/rotation/scale or whatever other values in a text editor, then recompile my entire engine (as there’s no separation between framework and scripts), then wait anywhere from 10-30s for it to launch. At which point I can see if indeed I moved an object to a desirable location, otherwise I must repeat this process. Level designing in my framework, is an excruciating process. I added the ability to create parent-child transform relationships initially just to speed up this arduous task.
In the latter half of the study, I ended up finding a new, more reasonable workflow. Instead of positioning things in the framework, I positioned everything in Blender, then simply copy-pasted those transform values in C#. One of the reasons I constructed the walking system the way I did is because it could fit seamlessly into this Blender centric workflow, converting walkable floor meshes to triangle colliders. Even after I discovered this workflow, placing a lot of individual entities in the space was still a tedious process. That’s one of the main reasons there are so few dynamic objects (along with some rendering limitations that I talked about earlier) in the final project.
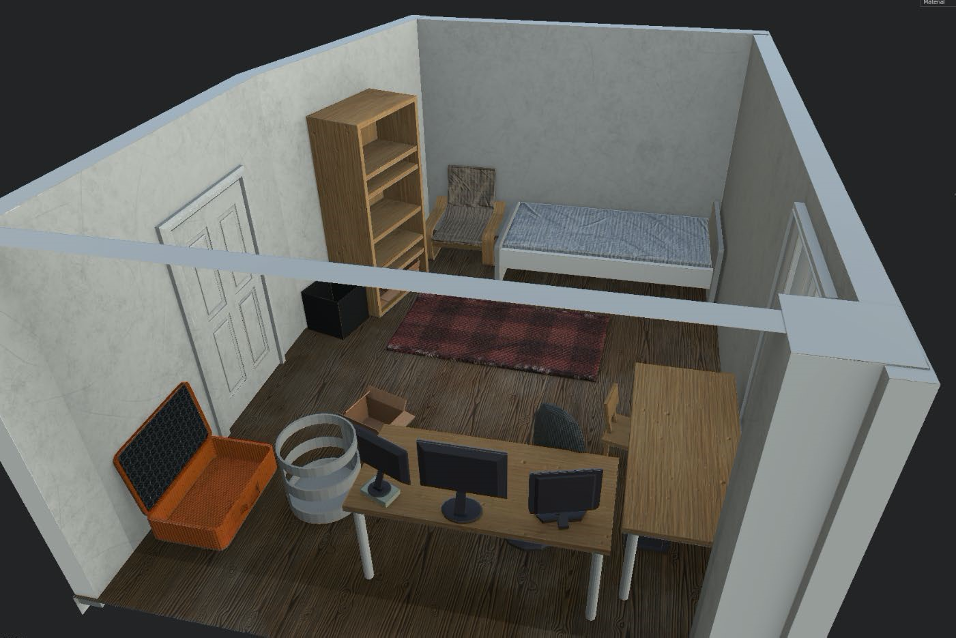
The Bedroom
Once I had all these features and systems in place, I was ready to begin working on the final level. I modelled the room which would appear within the webcams view after my own. In part this was practical, I have the reference standing literally all around me. But in part this was because all this interest in the gaze of the webcam and quarantine was coming from personal experience. Creating a replica of my room felt more honest, personal, and meaningful. The room was modelled in a pretty lo-fi manner, then all exported as a single mesh (for reasons already mentioned). I wish I had left a space behind my desk that players could walk behind so that they could rotate the webcam and see the frustrum’s effects on the space in real time. Instead I created a more or less exact, minimalist replica of my room.
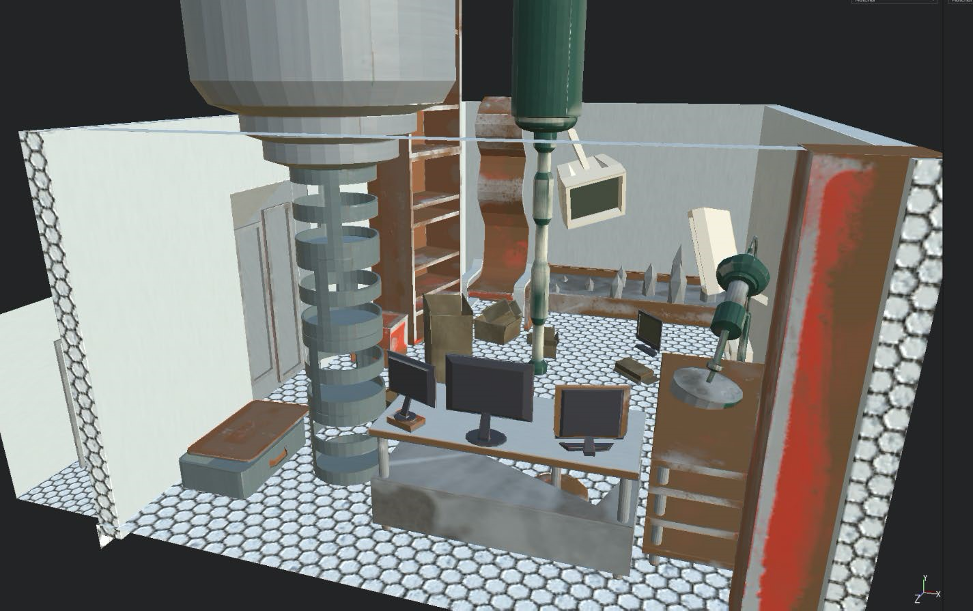
I then started on the other version of the bedroom, which would appear outside the cameras frustum. I had a lot of fun transforming this bedroom into a sort of surreal dungeon, turning laundry baskets and shelves into rusted, abstract unwieldy sculptural things stretching into the sky. I also used more traditional horror motifs, inserting spikes into my bed, replacing organic surfaces with metal ones. I initially felt pretty self conscious of the use of these campy motifs, by after showing it to Pippin and some of roommates, I gained confidence in the aesthetic.
The clean public facing room had a door with no handle. I like the way this offers a nod to the way video calls encourage us to forget the rooms they are taking place in are part of larger homes of human activity. Doors are transformed from entrances into familial spaces — to ornaments who decorate digital frames. This reminds me of the way in which traditional modern galleries have a similar effect of framing the work within them as a-temporal things, outside of history and the cities they are a part of. They become universal things, potentially in spite of the arts’ subject matter.
When players rotate the camera away from the door, it vanishes. What’s left is a stairwell leading down to some sort of basement. Of course, as soon as my roommates saw this, they wanted to check it out. But at this point the frustum effect was simply a shader with zero connections to the game’s systems. I worked on enabling the walking system to have floor colliders added and removed between frames. Then I added an entity which could toggle particular floor segments on or off depending on if they were in the webcams view. Now players could walk out of the bedroom when the door wasn’t there, but there wasn’t much that it led to.
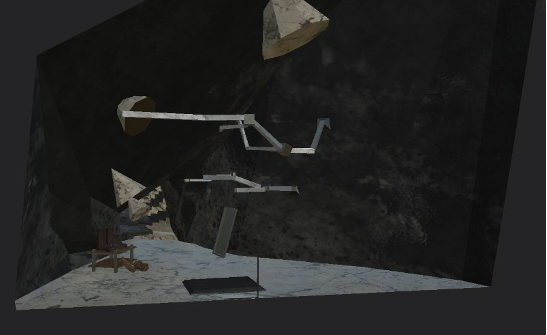
The Basement
I started constructing the basement, architecting a surreal space reminiscent of some early, silent, expressionist film. The room takes the shape of a cornucopia. Ballooning out, by the time a player reaches the other side the only thing that remains human scale is a door. As the player twists the handle and opens it their perspective changes so that they’re looking in at the space from the outside, the walls are transparent now, and players can see the door as they move it. When they let go their perspective returns to their avatar’s. Outside there’s a paper bag which can be picked up. If players take it and leave it upstairs, the perspective returns outside. That perspective begins moving away from the silhouetted house until it’s out of frame, leaving players a blank white window.
Delivery, for me, is one of the central motifs of quarantine, especially when it’s the delivery of food. Eating is traditionally a social activity, but during quarantine, for many who don’t live with their families, friends or partners, has become a much more isolating activity. To have food made in a public place by people, not more than an hour ago, proven by the lingering warmth of the ordered grub, and then to take that thing and consume it in such a private manner screams of quarantine.
Adding these couple little interactions and sequences made it so there were multiple story beats and a little narrative could emerge. These small additions (from a technical POV) made the whole experience feel much more whole and finished.
Shadows
In the name of getting things done on time, I had begun to let some bugs stick around and hang out in the latter half of my independent study. One of these bugs which I was determined to squash, however, was an issue with the shadow mapping system, which had stopped working about a month before the end of the study. The main reason I had let this go unaddressed for so long is because I wasn’t sure how shadow mapping was going to work in the final level anyways. I had implemented the most basic shadow mapping system possible, which used an orthographic camera, and assumed a directional (/sun) light. This works great for outdoor levels, but I hadn’t thought about how inappropriate this implementation would be for the intimate indoor quarters of a bedroom. There was another problem as well, a problem of size. The final level was too big for a single, static shadow map frustum to cover with any sort of precision. I didn’t have the time or desire to add a system which dynamically adjusted this shadow frustum as the player looked and walked around, while maintaining the same perceived light source. This type of system would be especially complicated as it would have to account for, and avoid being obstructed by, walls.
I didn’t have to time to fundamentally recode the shadow mapping system to address these problems. However, none of these issues would matter if the shadow’s frustum just matched the player camera’s own orientations. But then, in practice, any shadows would be invisible because it would the equivalent of placing a flashlight directly between your eyes pointed forward — any cast shadows would be directly pointed away from you, from your POV perfectly obscured. My solution was to simply delay the process by which the shadow frustum followed the player, so it lagged behind. This would result in some weird effects if the player turned quickly, but that could be part of the aesthetic. I love the way in which this effect is implicitly driven by motion. Keep moving, and you can see shadows sweeping across the screen, along with the dizzying distortions they bring. Stand still, and the shadows are slowly swept up by the furniture until they disappear behind them.
I decided in the bedroom, to not have the cast shadows reflect the shifting geometry determined by the webcam’s gaze. Instead I made it so the horror version of the room was the only one that would be a source for shadows. This meant that players could now see shadows, cast onto the clean version of the room, perhaps the silhouette of a spike, or a protruding sculptural thing, that wasn’t otherwise directly visible to them. This feels super appropriate to the interests of the study. Mental ailment, whatever its sources or effects might be, is often difficult to consciously recognize and grasp, it may never surface directly. Nevertheless, the weight it casts is undeniable.
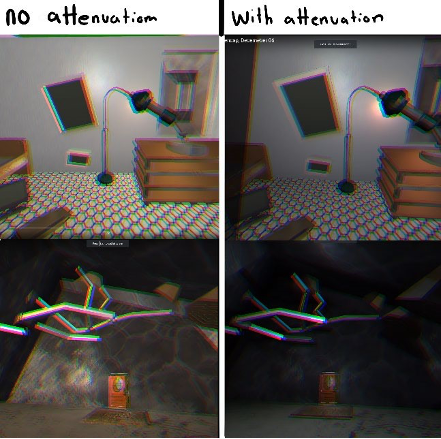
Attenuation
I also added light attention at this point, so that point lights’ brightness didn’t carry infinitely far. A mood could now much more effectively be created, as various parts of the level could now be lit differently.
Conclusion
In the end, I’m pretty satisfied with results of the independent study, both in its artistic and technical goals. I taught myself the fundamentals of OpenGL. Implementing all but one feature I was interested in (being reflections). I wrote the vast majority of code from scratch, relying on tutorials only on some of the more math-y topics — like with shadow mapping or raycasting against planes. I got to work on one of my biggest solo projects yet, which gave me the unique chance to feel the repercussions of, and deal with, subtle architectural decisions made months in the past. This is something to appreciate especially as a student, whose vast majority of my work takes the form of small, isolated projects. Of course, there has been a healthy accumulation of ideas about how I would structure things differently the next time to avoid some of the experienced pitfalls. I also got to explore a topic which has interested me since the start of the pandemic. I now have a little game which is a record of these feelings.
Leave a comment
Log in with itch.io to leave a comment.